Recently got an inverter installed, specifically the Victron MultiPlus II and the Victron Cerbo GX. Everything in the house runs through the inverter, I wanted to integrate my Victron into Home Assistant to create some automation. To power and not power certain things around the house depending on whether I'm running off battery or not. I've created a guide below on how to pair the Victron inverter with Home Assistant as well as a basic automation to start off. I'm new to Home Assistant... I'll get more creative with this as time goes on. If anyone has input on what I should/could change, please let me know. Most of my guide is a combination of various guides I followed and assumes you know nothing, which is the boat I was in. I typed the below out after doing all of it, hopefully I haven't made any errors, if something is different on your side or confusing let me know.
First, you'll need something to run Home Assistant, I have an ancient Dell Optiplex (running Windows 10 Pro) that currently runs PiHole (another great app worth looking into). This is what I ended up using for Virtualbox/Home Assistant. So far, I've noticed that 8GB of RAM didn't cut it (well just barely), was hovering around 7GB usage with Virtualbox/Home Assistant VM and Docker/PiHole running. Added more RAM, ended up with 12GB in total which gives me more headroom, this shouldn't really affect anything but worth noting.
Setting up your Victron system:
Your Victron system must be connected to the same network/WiFi that your Home Assistant server is on. If they're not on the same network, you won't be able to pull the data across (or at least how I understand it). You'd change the WiFi connection settings in your VRM Remote Console (on the Victron system).
1. Log into your VRM Portal account, this should already be available to you from your installer - VRM Portal - Victron Energy
2. You will need full control over the account and not monitoring rights.
3. Remote Console (on the left side bar).
4. Settings > Services > Modbus TCP > Enable Modbus/TCP. I mention later that if you have a different inverter model / Cerbo, your unit ID's will be different. You'd get these unit ID's within this settings menu.
Setting up Virtualbox & Home Assistant:
1. Download Virtualbox (VirtualBox x.x.xx platform packages > Windows hosts) - Downloads – Oracle VM VirtualBox
2. Download Home Assistant (VirtualBox (.vdi)) - Windows
3. Install Virtualbox.
4. Create a folder on your desktop and extract the Virtualbox .vdi file into it (you'll end up keeping this folder - don't delete it).
5. Open up Virtualbox and click New.
6. Name: homeassistant (must be one word) / Machine Folder: this will be the folder you extracted the .vdi file to / Type: Linux / Version: Other Linux (64-bit) / Memory size: 2048 MB / Select "Use an existing virtual hard disk file" - this will be the folder you extracted the .vdi file to.
7. Create.
8. Open the settings for the homeassistant VM you just created.
9. System tab - Motherboard: make sure you have 2GB / 2048MB of Base Memory and check Enable EFI (special OSes only). Processor: set Processor(s): to 2.
10. Audio tab - Audio Controller: Intel HD Audio.
11. Network tab - Adapter 1: Attached to: Bridged Adapter. Make sure the Name is the NIC on your machine.
12. Highlight the homeassistant VM and click Start.
13. Let it finish setting up and booting. Eventually it'll show a page with Home Assistant typed out by weird characters. You'll see below the Home Assistant text "IPv4 address for enp0s3: <ip address here>".
14. Copy that IP and put :8123 at the end (something like 0.0.0.0:8123) and enter it into your browser.
15. Setup your Home Assistant profile.
16. You'll need to create a batch file to run your Virtualbox (and homeassistant VM) when Windows boots. My Dell is headless, so I don't want to remote in every time to start up the VM.
17. Open notepad and paste the below.
"C:\Program Files\Oracle\VirtualBox\VBoxManage.exe" startvm homeassistant --type headless
18. Save the file as homeassistant.bat in your start up folder (Start > Run > shell:startup). Shutdown the homeassistant VM and Virtualbox and run the batch file to confirm it works... or just restart your machine.
Source: LINK
Setting up Home Assistant:
1. Settings.
2. Add-ons.
3. Add-on store.
4. Search for "File editor".
5. Install it and check "Show in sidebar".
6. File editor should now be on the left side bar. Open it.
7. On the blue bar at the top-left, click the folder icon and search for configuration.yaml and open it.
8. Below the text that's already there, paste the below (see LINK). - If you want to pull more data have a look at: LINK. Also, worth noting that if you have a different model inverter or Cerbo, your unit ID's will be different. You'll need to change your IP (host - below) to the IP of your cerbo (I got mine from my routers client list).
LINK
9. Developer Tools (on the left side bar) on the YAML tab click Check Configuration, assuming its valid click Restart.
10. Once restarted. Click on Developer Tools (on the left side bar) click on States, scroll until you find your Victron data. Check to see if the state values are changing to confirm data is being brought across.
11. The above data should also be viewable on your Home Assistant dashboard, mine added itself automatically.
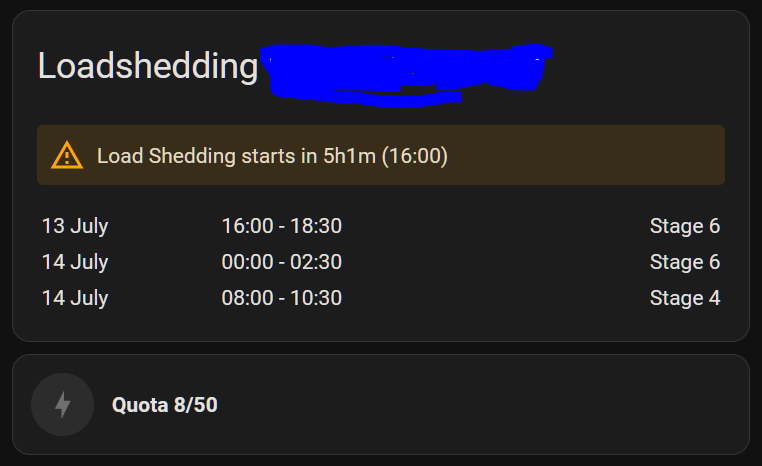
12. If "Victron AC Power" = 1 (you don't have loadshedding). 240 = you've got loadshedding and running off battery power.
13. In my case I've got a few Bneta smart plugs (which work with my Smart Life phone app), most of the information that follows will apply to setting them up, I'm not sure what other devices will work here.
14. Settings (on the left side bar) and click Devices & Services.
15. Click + Add Integration.
16. Search for Tuya.
17. Before entering in any information for the above you'll need to setup Tuya and link it to your Smart Life app account. Create a Tuya account here: https://auth.tuya.com/. Follow this guide to link your Tuya account to your Smart Life account: Tuya
18. Once Tuya is setup, you'll be able to view your devices under Settings > Devices & Services.
19. Settings > Automations & Scenes > Create Automation. To indicate when loadshedding has started I setup a RED LED strip in my kitchen to turn on (and turn off when there's no loadshedding).
Automation 1
Loadshedding - Start
*Trigger:
Numerical state
Entity: Victron AC Power
Attribute: <blank>
Above: 120
Below: <blank>
Value template (optional): <blank>
For (optional): <blank>
*Action:
Device
Device: Smart Plug
Action: Turn on Smart Plug
//
Automation 2
Loadshedding - End
*Trigger:
Numerical state
Entity: Victron AC Power
Attribute: <blank>
Above: <blank>
Below: 120
Value template (optional): <blank>
For (optional): <blank>
*Action:
Device
Device: Smart Plug
Action: Turn off Smart Plug
Hopefully this helps any other Victron owners and gives you a good start to doing more automations.
First, you'll need something to run Home Assistant, I have an ancient Dell Optiplex (running Windows 10 Pro) that currently runs PiHole (another great app worth looking into). This is what I ended up using for Virtualbox/Home Assistant. So far, I've noticed that 8GB of RAM didn't cut it (well just barely), was hovering around 7GB usage with Virtualbox/Home Assistant VM and Docker/PiHole running. Added more RAM, ended up with 12GB in total which gives me more headroom, this shouldn't really affect anything but worth noting.
Setting up your Victron system:
Your Victron system must be connected to the same network/WiFi that your Home Assistant server is on. If they're not on the same network, you won't be able to pull the data across (or at least how I understand it). You'd change the WiFi connection settings in your VRM Remote Console (on the Victron system).
1. Log into your VRM Portal account, this should already be available to you from your installer - VRM Portal - Victron Energy
2. You will need full control over the account and not monitoring rights.
3. Remote Console (on the left side bar).
4. Settings > Services > Modbus TCP > Enable Modbus/TCP. I mention later that if you have a different inverter model / Cerbo, your unit ID's will be different. You'd get these unit ID's within this settings menu.
Setting up Virtualbox & Home Assistant:
1. Download Virtualbox (VirtualBox x.x.xx platform packages > Windows hosts) - Downloads – Oracle VM VirtualBox
2. Download Home Assistant (VirtualBox (.vdi)) - Windows
3. Install Virtualbox.
4. Create a folder on your desktop and extract the Virtualbox .vdi file into it (you'll end up keeping this folder - don't delete it).
5. Open up Virtualbox and click New.
6. Name: homeassistant (must be one word) / Machine Folder: this will be the folder you extracted the .vdi file to / Type: Linux / Version: Other Linux (64-bit) / Memory size: 2048 MB / Select "Use an existing virtual hard disk file" - this will be the folder you extracted the .vdi file to.
7. Create.
8. Open the settings for the homeassistant VM you just created.
9. System tab - Motherboard: make sure you have 2GB / 2048MB of Base Memory and check Enable EFI (special OSes only). Processor: set Processor(s): to 2.
10. Audio tab - Audio Controller: Intel HD Audio.
11. Network tab - Adapter 1: Attached to: Bridged Adapter. Make sure the Name is the NIC on your machine.
12. Highlight the homeassistant VM and click Start.
13. Let it finish setting up and booting. Eventually it'll show a page with Home Assistant typed out by weird characters. You'll see below the Home Assistant text "IPv4 address for enp0s3: <ip address here>".
14. Copy that IP and put :8123 at the end (something like 0.0.0.0:8123) and enter it into your browser.
15. Setup your Home Assistant profile.
16. You'll need to create a batch file to run your Virtualbox (and homeassistant VM) when Windows boots. My Dell is headless, so I don't want to remote in every time to start up the VM.
17. Open notepad and paste the below.
"C:\Program Files\Oracle\VirtualBox\VBoxManage.exe" startvm homeassistant --type headless
18. Save the file as homeassistant.bat in your start up folder (Start > Run > shell:startup). Shutdown the homeassistant VM and Virtualbox and run the batch file to confirm it works... or just restart your machine.
Source: LINK
Setting up Home Assistant:
1. Settings.
2. Add-ons.
3. Add-on store.
4. Search for "File editor".
5. Install it and check "Show in sidebar".
6. File editor should now be on the left side bar. Open it.
7. On the blue bar at the top-left, click the folder icon and search for configuration.yaml and open it.
8. Below the text that's already there, paste the below (see LINK). - If you want to pull more data have a look at: LINK. Also, worth noting that if you have a different model inverter or Cerbo, your unit ID's will be different. You'll need to change your IP (host - below) to the IP of your cerbo (I got mine from my routers client list).
LINK
9. Developer Tools (on the left side bar) on the YAML tab click Check Configuration, assuming its valid click Restart.
10. Once restarted. Click on Developer Tools (on the left side bar) click on States, scroll until you find your Victron data. Check to see if the state values are changing to confirm data is being brought across.
11. The above data should also be viewable on your Home Assistant dashboard, mine added itself automatically.
12. If "Victron AC Power" = 1 (you don't have loadshedding). 240 = you've got loadshedding and running off battery power.
13. In my case I've got a few Bneta smart plugs (which work with my Smart Life phone app), most of the information that follows will apply to setting them up, I'm not sure what other devices will work here.
14. Settings (on the left side bar) and click Devices & Services.
15. Click + Add Integration.
16. Search for Tuya.
17. Before entering in any information for the above you'll need to setup Tuya and link it to your Smart Life app account. Create a Tuya account here: https://auth.tuya.com/. Follow this guide to link your Tuya account to your Smart Life account: Tuya
18. Once Tuya is setup, you'll be able to view your devices under Settings > Devices & Services.
19. Settings > Automations & Scenes > Create Automation. To indicate when loadshedding has started I setup a RED LED strip in my kitchen to turn on (and turn off when there's no loadshedding).
Automation 1
Loadshedding - Start
*Trigger:
Numerical state
Entity: Victron AC Power
Attribute: <blank>
Above: 120
Below: <blank>
Value template (optional): <blank>
For (optional): <blank>
*Action:
Device
Device: Smart Plug
Action: Turn on Smart Plug
//
Automation 2
Loadshedding - End
*Trigger:
Numerical state
Entity: Victron AC Power
Attribute: <blank>
Above: <blank>
Below: 120
Value template (optional): <blank>
For (optional): <blank>
*Action:
Device
Device: Smart Plug
Action: Turn off Smart Plug
Hopefully this helps any other Victron owners and gives you a good start to doing more automations.
Last edited: